If you have been searching for the perfect way to transform your backyard into a productive, beautiful growing space, then design raised garden beds plans are exactly where you need to start. Raised garden beds offer gardeners of all skill levels the ability to control soil quality, improve drainage, reduce weed pressure, and create visually stunning outdoor layouts. Whether you are a complete beginner looking for your first raised garden bed layout ideas or a seasoned gardener planning a complex tiered system, having a well-thought-out plan makes all the difference between a thriving garden and a frustrating one. In this comprehensive guide, we will walk you through everything you need to know about designing, planning, and building raised garden beds that will serve your family for years to come.
Understanding Raised Garden Bed Design Fundamentals
Before you grab a saw or order lumber, it helps to understand the core principles behind effective raised garden bed plans. A well-designed raised bed is not just about stacking wood and filling it with dirt. Every dimension, orientation, and material choice affects how your plants grow, how much maintenance the bed requires, and how it fits into your overall landscape design.
Why Raised Beds Are Worth Your Time
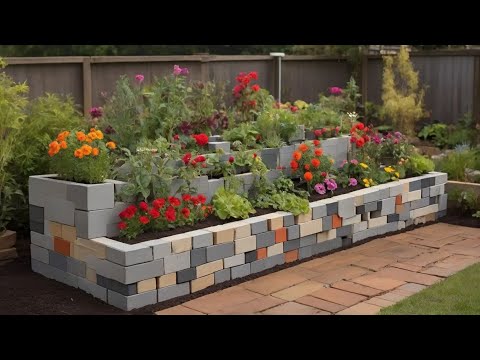
Raised garden beds solve some of the most common gardening challenges homeowners face. Poor native soil, drainage issues, and compacted ground become non-issues when you build above grade. The contained structure also means you can fill the bed with exactly the soil blend your plants need. For anyone designing a backyard raised garden bed layout, the benefits extend beyond plant health — raised beds create clear, defined zones in your yard that look intentional and polished.
- Superior drainage prevents root rot and waterlogging
- Warmer soil temperatures extend your growing season by weeks
- Reduced weed pressure because you control what goes into the bed
- Ergonomic heights reduce back and knee strain during planting and harvesting
- Clear visual structure that enhances your landscape’s overall aesthetic
Popular Raised Garden Bed Plans and Layout Ideas
The beauty of designing raised garden beds is that there is no single right approach. Your ideal plan depends on available space, your gardening goals, physical ability, and personal style. Let us explore some of the most popular and effective configurations.
Simple Rectangle Beds for Beginners
If you are new to gardening, starting with a straightforward rectangular raised bed is your best move. A classic 4-foot by 8-foot raised garden bed plan hits the sweet spot between manageable size and growing capacity. At four feet wide, you can reach the center from either side without stepping onto the soil. Eight feet long gives you plenty of room for row planting or square-foot gardening grids. This dimension works beautifully for vegetables, herbs, and flowering plants alike.
For deeper-rooted crops like tomatoes and carrots, aim for a bed height of at least 12 inches. If accessibility is a priority, consider building your raised bed garden design at 24 to 36 inches tall, which allows comfortable standing or seated gardening without bending.
L-Shaped and Tiered Designs for Advanced Gardeners
Intermediate and advanced gardeners often move beyond single rectangles toward more ambitious raised garden bed layout plans. An L-shaped bed wraps around a corner of your yard, creating a natural sitting area in the center while doubling your planting space. Tiered designs use stacked or stepped beds of varying heights, which adds visual depth and allows you to group plants by their sunlight and water needs.

- U-Shaped Beds: Three connected rectangles form a sheltered growing area perfect for companion planting
- Circular Spiral Beds: A stone or timber spiral creates microclimates at different heights, ideal for herbs
- Keyhole Gardens: A circular bed with a wedge-shaped notch and central compost basket maximizes small spaces
- Vertical Stacked Beds: Tiered layers reduce footprint while increasing growing surface area
Choosing the Right Materials for Your Raised Bed Plans
The material you choose for your raised garden bed construction plans directly affects durability, safety, cost, and appearance. Each option has distinct advantages, and your climate and budget will help narrow the field.
Wood vs. Metal vs. Stone Comparison
| Material | Lifespan | Cost | Best For |
| Cedar or Redwood | 10–15 years | Moderate | Organic gardens, natural aesthetics |
| Pressure-Treated Pine | 15–20 years | Low to Moderate | Budget-conscious builds, durability |
| Galvanized Steel | 20–30 years | Moderate to High | Modern looks, excellent heat retention |
| Concrete Blocks | 25+ years | Moderate | Permanent installations, thermal mass |
| Natural Stone | 30+ years | High | Landscaping integration, permanent beauty |
Cedar and redwood remain the top choices for most DIY gardeners because they are naturally rot-resistant without chemical treatments. If you prefer a modern, sleek look, galvanized steel raised bed kits have become increasingly popular and are incredibly long-lasting. For those planning a permanent landscape feature, concrete blocks or natural stone provide unmatched durability and a refined appearance that complements any raised garden bed design ideas.
Step-by-Step Guide to Building Raised Garden Beds
Now that you have your plan and materials selected, let us walk through the actual building process. Following a structured approach ensures your raised bed is level, sturdy, and ready for productive growing.
Measuring and Preparing Your Site
Start by marking your bed location on the ground. Choose a spot that receives at least six to eight hours of direct sunlight daily for most vegetables. Use stakes and string to outline your bed dimensions on the grass or soil. Clear away any existing vegetation, roots, and debris from within the marked area. Level the ground inside the outline as much as possible — an uneven base can cause uneven water distribution and structural stress on your bed walls.
For permanent installations, consider laying down cardboard or landscape fabric beneath the bed to suppress weeds while still allowing drainage. This simple step prevents weeds from pushing up through your beautiful new raised bed garden plans and saves you significant maintenance effort over time.
Assembly and Soil Filling Tips
Assemble your frame on a flat surface before moving it into position if possible. Pre-drill screw holes to prevent wood splitting, and use exterior-grade screws or stainless-steel hardware for longevity. Once your frame is in place, check for level using a spirit level — an uneven bed causes water to pool on one side, which can drown plant roots or create dry patches.
For soil, follow the proven lasagna gardening method for filling raised beds. Start with a layer of coarse branches or straw for drainage, followed by cardboard, then alternating layers of green (nitrogen-rich) and brown (carbon-rich) compostable materials. Top with high-quality garden soil mixed with compost and aged manure. A well-filled raised bed should be filled about two inches below the rim to allow for mulch and watering without overflow.
Best Plants and Layout Strategies for Raised Garden Bed Designs
Your raised garden bed planting plans should consider companion planting, crop rotation, and spatial efficiency. Tall plants like corn and pole beans work best along the north side so they do not shade shorter crops. Root vegetables such as carrots, radishes, and beets thrive in the deep, loose soil that raised beds provide. Leafy greens and herbs can be interplanted between larger crops to maximize every square inch of growing space.
For a small raised garden bed design, square foot gardening is your most efficient approach. Divide your bed into one-foot squares and plant the appropriate number of plants per square according to their size — one tomato per square, nine lettuce plants, sixteen radishes, and so on. This method is particularly effective for designing raised garden beds for small spaces where every inch matters.
Frequently Asked Questions About Raised Garden Bed Plans
What is the best size for a beginner raised garden bed? A four-foot by four-foot or four-foot by eight-foot bed is ideal for beginners because it provides ample growing space while remaining easy to reach across from any side. Beds wider than four feet force you to step into the growing area, which compacts the soil and defeats one of the primary benefits of raised beds.
How deep should a raised garden bed be for vegetables? Most vegetables require at least 12 inches of soil depth to develop healthy root systems. However, if you plan to grow deep-rooted crops like carrots, parsnips, or daikon radishes, aim for 18 to 24 inches of depth. Some gardeners build beds on top of existing lawn or hard surfaces using landscape fabric and deep fill, which allows for even shallower frames with sufficient soil depth.
Can you use raised garden bed plans on a slope or hillside? Absolutely. Terracing with raised beds is one of the most effective ways to garden on a slope. Build each bed level and use the retaining wall effect of adjacent beds to hold soil in place. Ensure proper drainage between tiers by leaving small gaps or using perforated drainage pipes to prevent water from building up behind the lower bed walls.
What is the cheapest way to build raised garden beds? Using reclaimed pallets, untreated pine boards, or even stacked hay bales offers the most budget-friendly approach to DIY raised garden bed plans. Pressure-treated pine is another affordable option that lasts many years. The key is balancing cost with safety — avoid materials treated with chemicals like creosote or pentachlorophenol, which can leach harmful substances into your edible crops.
How do you design raised garden beds for accessibility and disability-friendly gardening? Build your beds at a height of 24 to 36 inches so they are comfortable to reach from a seated position or wheelchair. Keep the width to no more than two to three feet so that every part of the bed is reachable from the edge without stretching. Consider adding a removable or hinged frame section for wheelchair access, and fill with lightweight soil mixes that reduce the overall weight of the bed.
Do raised garden beds need a bottom or liner? Most raised garden beds do not require a bottom — the open base allows beneficial organisms like earthworms to enter and improves drainage naturally. However, if you are building beds on a concrete patio or in an area with persistent burrowing pests, a hardware cloth bottom liner prevents soil loss and keeps moles and gophers out. For beds placed on wooden decks or balconies, a plastic liner prevents moisture damage to the underlying surface while still allowing drainage through designated weep holes.
Conclusion
Designing and building raised garden beds is one of the most rewarding investments you can make in your outdoor space. Whether you start with a simple four-by-eight-foot rectangle or commit to a complex tiered layout, the key is having a clear raised garden bed plan before you cut a single piece of wood. The plans and strategies outlined in this guide give you a solid foundation — from material selection and site preparation to planting strategies and long-term maintenance. Take the time to assess your space, choose materials that suit your climate and aesthetic, and build with precision. Your future self, standing in a lush, productive garden, will thank you for every careful decision you made at the planning stage. Start small, learn as you grow, and expand your raised garden bed system year after year. Happy building, and happy growing.