


The world of home design has undergone a dramatic transformation over the past decade, and 3D home design sits right at the heart of that revolution. What was once a luxury reserved for architectural firms with six-figure budgets has become something anyone with a computer and an internet connection can access today. Whether you are planning a full-home renovation, building from the ground up, or simply dreaming about your ideal living space, 3D home design tools let you bring your vision to life with stunning realism and precision. In this comprehensive guide, we will explore everything you need to know about creating, refining, and using 3D home models to make smarter design decisions before a single wall is built.
What Is 3D Home Design and Why It Matters?
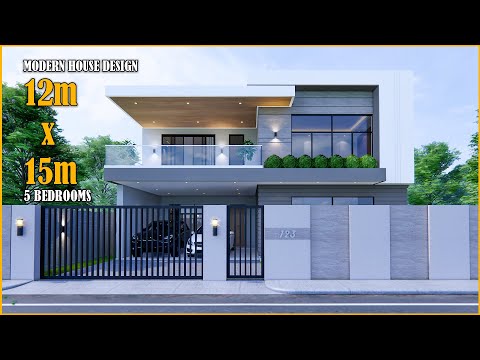
3D home design refers to the process of creating a three-dimensional digital representation of a residential building or interior space. Unlike traditional two-dimensional floor plans, a 3D model captures height, depth, and width, allowing homeowners, architects, and designers to explore every angle of a structure before construction begins. This technology uses specialized software that renders photorealistic images, walk-through animations, and interactive floor plans that feel almost indistinguishable from a real photograph.
What makes 3D home design so powerful is its ability to bridge the gap between imagination and reality. When you can virtually walk through your future kitchen, bedroom, or backyard, you catch mistakes early and discover ideas you never considered on paper. It transforms abstract blueprints into a tangible experience that builds confidence in every design choice.
Key Benefits of Using 3D Home Design Software
Switching to a 3D home design workflow delivers advantages that go far beyond simply making things look better on screen. Here are the most impactful benefits homeowners and professionals experience:
Realistic Visualization Before Spending a Dime
The single biggest advantage of 3D home rendering is the ability to see exactly how materials, colors, lighting, and furniture will look in the finished space. You can test different tile patterns in a bathroom, experiment with cabinet styles in a kitchen, or compare hardwood versus laminate flooring — all without purchasing a single sample. This dramatically reduces the risk of costly post-renovation regrets.
Better Communication With Contractors and Clients
When you hand a contractor a 3D model or walkthrough video, misunderstandings shrink significantly. Everyone involved — from the architect to the builder to the homeowner — shares a clear, unified vision of the final product. This clarity translates to fewer change orders, fewer disputes, and a smoother construction process overall.
Cost and Time Savings

Making changes in a digital environment costs virtually nothing compared to altering work already in progress on a job site. Studies suggest that homeowners who use 3D design tools save an average of 10–15% on redesign costs because they identify problems early. Time is also saved because decisions are made faster when everyone can visualize the outcome together.
Top 3D Home Design Tools and Platforms
The market for 3D home design software has exploded, and there are now options suited to every skill level and budget. Let us break down the leading platforms into categories based on user experience.
Beginner-Friendly Options
If you are new to home design, these platforms offer intuitive drag-and-drop interfaces and pre-built object libraries that make getting started effortless:
- Planner 5D — A cloud-based tool with an extremely gentle learning curve. It offers both 2D and 3D views, a massive catalog of furniture and fixtures, and even AR features that let you visualize designs in your actual room using a smartphone camera.
- RoomSketcher — Popular for its ease of use, RoomSketcher allows you to draw floor plans and instantly generate 3D views and high-quality floor plan images. It is ideal for real estate professionals and homeowners alike.
- Homestyler — Owned by Autodesk, Homestyler provides browser-based 3D design capabilities with a library of real-world products from actual brands, giving your virtual rooms an authentic, furnished look.
Intermediate and Professional-Grade Software
For users who need more control, precision, and photorealistic output, these tools deliver professional results:
- SketchUp Pro — A versatile 3D modeling platform that balances flexibility with usability. It is widely used by interior designers and architects for creating custom furniture, complex rooflines, and detailed interior spaces. Its warehouse of user-generated models adds enormous value.
- AutoCAD Architecture — The industry standard for professional architectural design. AutoCAD offers unparalleled precision and supports BIM (Building Information Modeling) workflows, making it the go-to choice for serious construction projects.
- Revit by Autodesk — A full-featured BIM tool that goes beyond visualization to include structural analysis, energy modeling, and construction documentation. It is the backbone of modern architectural firms worldwide.
- Lumion — Specializes in stunning real-time architectural visualization. You import your 3D model from SketchUp, Revit, or other platforms and instantly apply materials, lighting, weather effects, and cinematic camera movements to produce breathtaking walkthrough videos.
3D Home Design vs Traditional Floor Plans
While traditional 2D floor plans remain valuable for technical documentation, 3D home design offers a fundamentally different and more intuitive way to experience a space. Here is a direct comparison to help you understand where each approach excels:
| Feature | Traditional Floor Plans | 3D Home Design |
| Visualization | Flat, abstract, requires imagination | Photorealistic, immersive, spatial |
| Learning Curve | Moderate for reading; low for creating | Varies from beginner to advanced |
| Cost | Low for basic plans | Free to several thousand dollars for software |
| Client Communication | Technical, limited engagement | Highly engaging, walkthrough-capable |
| Error Detection | Difficult to spot spatial issues | Easily identify clashes, sizing problems |
| Presentation Value | Standard, expected | Impressive, professional, compelling |
| Use in Construction | Industry standard for permits | Complementary; not a replacement for permits |
The reality is that the best professionals use both. A detailed 2D plan satisfies building codes and permits, while a 3D model helps everyone involved understand and approve the design emotionally and visually.
Step-by-Step Guide to Creating Your 3D Home Design
Whether you are a first-time homeowner or a seasoned interior designer, following a structured workflow will dramatically improve your results:

- Define Your Goals and Budget. Before opening any software, write down what you want to achieve. Are you redesigning a single room or the entire house? What is your maximum budget for furniture and finishes? Having clear parameters prevents you from getting lost in the endless possibilities of 3D design.
- Measure Your Space Accurately. Grab a laser measure and document every wall length, window and door placement, ceiling height, and any architectural features like columns or alcoves. Accurate measurements are the foundation of any credible 3D model.
- Choose the Right Software. Match your tool to your skill level and project scope. A simple room remodel might only need Planner 5D, while a whole-house build warrants SketchUp Pro or Revit.
- Create the Floor Plan in 2D First. Draw your layout as a flat plan before switching to 3D. This ensures walls, doors, and windows are positioned correctly before you add the visual complexity of a three-dimensional model.
- Convert to 3D and Build Up. Extrude your walls to the correct height, add floors, stairs, and roof structures. Layer in architectural details like crown molding, bay windows, or built-in shelving.
- Apply Materials, Colors, and Textures. This is where your design starts to feel real. Assign flooring, wall paint or wallpaper, countertop materials, and cabinetry finishes. Most platforms let you adjust textures, grain patterns, and sheen levels.
- furnish and Style the Space. Populate each room with furniture, lighting fixtures, artwork, plants, and decor. Pay attention to scale — a sofa that looks great in a catalog might appear tiny in your 3D room if the proportions are off.
- Set the Lighting and Camera Angles. Adjust natural light based on window orientation and time of day. Position virtual cameras at eye level and from interesting angles to capture the best views of each space.
- Review, Iterate, and Refine. Walk through your virtual home multiple times. Move furniture, swap materials, and test different layouts. The beauty of digital design is that nothing is permanent until you decide it is.
- Share and Present Your Design. Export high-resolution images, 360-degree panoramas, or video walkthroughs to share with family, contractors, or clients. Most platforms support multiple export formats for maximum flexibility.
Expert Tips for Stunning 3D Home Visualizations
Even the best software can produce mediocre results if you do not apply some core design principles. Here are professional tips that elevate your 3D home models from basic to breathtaking:
- Use real-world lighting settings. Most software lets you adjust sun position and time of day. Morning light creates long, warm shadows, while midday light is harsh and neutral. Choose lighting that matches your intended mood and the room’s orientation.
- Follow the rule of thirds in camera placement. Just like photography, composing your 3D renderings with off-center focal points creates more dynamic and visually appealing images.
- Add human-scale elements. Place a vase of flowers, a stack of books, or a coffee mug on the virtual table. These small details make a space feel lived-in and help viewers mentally inhabit the room.
- Keep material consistency. Mixing too many textures — for example, a marble countertop, a wood floor, a patterned rug, and a velvet sofa — can create visual clutter. Stick to a cohesive palette of two to three primary materials per room.
- Export at the highest resolution possible. Low-resolution renders look pixelated and amateur. For presentations, always export at 4K or higher and use PNG or TIFF formats to preserve quality.
The Future of 3D Home Design Technology
The trajectory of 3D home design points toward even greater accessibility and realism. Artificial intelligence is now being integrated into platforms like Planner 5D and Homestyler, enabling users to generate complete room designs from a simple text description or a single photo of an empty space. Augmented reality allows homeowners to project 3D furniture models directly into their actual rooms using nothing more than a smartphone. Meanwhile, virtual reality headsets are making full-immersion walkthroughs accessible to consumers, not just professionals. As these technologies mature, the line between a digital model and physical reality will continue to blur, making pre-construction visualization more powerful and indispensable than ever before.
Frequently Asked Questions
What is the best free 3D home design software for beginners?
Planner 5D and Homestyler are widely considered the best free options for beginners. Both offer intuitive interfaces, large catalog libraries, and the ability to create full 3D room designs without any prior design experience. They run in your web browser, so there is no software to install.
How long does it take to learn 3D home design software?
For beginner-friendly tools like Planner 5D or RoomSketcher, most users feel comfortable creating basic designs within a few hours of practice. Professional-grade software like SketchUp Pro or Revit typically requires one to four weeks of dedicated learning, depending on your background with design or technical software. Plenty of free tutorials on YouTube and platform-specific training resources can accelerate this process significantly.
Can I use 3D home design to get building permits?
No — 3D models are visualization tools and are generally not accepted as official permit documents. Building authorities require detailed 2D architectural plans that include precise dimensions, structural details, and code compliance information. However, a 3D model is an excellent companion document that helps communicate your design intent to reviewers and neighbors.
What computer specs do I need for professional 3D home design?
For smooth operation of software like SketchUp Pro or Lumion, you should have at least 16 GB of RAM, a dedicated graphics card with 4 GB or more of VRAM (such as an NVIDIA GTX or RTX series), and a modern multi-core processor. Solid-state storage (SSD) significantly improves loading times for large projects with high-resolution textures.
Is 3D home design worth the investment for a small renovation?
Absolutely. Even for a small bathroom or kitchen remodel, 3D home design helps you make confident decisions about materials, layout, and budget. Many free or low-cost tools let you create professional-quality visualizations that save you money by preventing expensive mistakes and ensuring every dollar is spent on the right products and finishes.
Final Thoughts
3D home design has fundamentally changed how we plan, visualize, and execute residential projects. From the simplest bedroom refresh to the most complex custom home build, the ability to see, experience, and refine your design in three dimensions before breaking ground is nothing short of transformative. The tools are more accessible, more powerful, and more affordable than they have ever been. Whether you are a curious homeowner taking your first steps or a seasoned designer looking to sharpen your workflow, now is the perfect time to embrace 3D home design and bring your vision to life with confidence and clarity.