


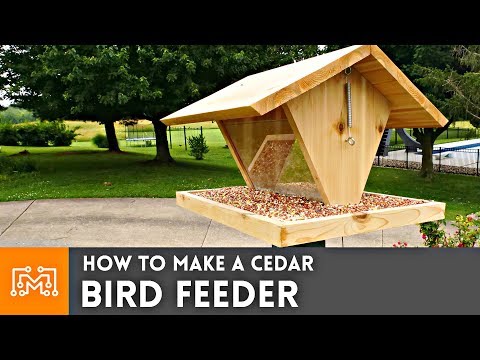
If you have ever wanted to bring more birds into your backyard while flexing your woodworking muscles, bird feeder woodworking plans are the perfect starting point. Whether you are a complete beginner picking up a saw for the first time or a seasoned woodworker looking for a satisfying weekend project, building a bird feeder from scratch gives you total control over materials, dimensions, and design. In this comprehensive guide, we walk you through everything you need to know, from choosing the right woodworking plans to selecting durable wood species, cutting lists, assembly techniques, and finishing tips that will help your creation withstand seasons of outdoor use.
Why Bird Feeder Woodworking Plans Are Worth Your Time
There is a profound difference between buying a generic bird feeder off the shelf and building one from detailed, well-tested bird house woodworking plans. When you follow curated woodworking project plans, every cut, every joint, and every final coat serves a purpose. You know exactly which wood species works best, how to waterproof the surfaces, and what dimensions attract specific bird species. Beyond the functional benefits, constructing a bird feeder becomes a deeply rewarding backyard hobby that connects you with nature and sharpens your hand-tool and power-tool skills simultaneously.
Well-designed DIY bird feeder plans also account for drainage, ventilation, and easy cleaning, which are details most store-bought options overlook. If you care about bird watching and want to attract cardinals, chickadees, or finches to your yard, a handmade feeder built from solid wood proves far more durable and visually appealing than plastic alternatives.

Best Bird Feeder Woodworking Plans for Beginners
Starting out can feel overwhelming when you browse hundreds of free bird feeder plans online, but the best approach is to pick a project that matches your current skill level. Below are three beginner-friendly designs that require minimal tools and straightforward joinery.
Platform Bird Feeder Plans
The platform feeder is the simplest design in the world of bird watching woodworking. It is essentially a shallow tray with raised edges and a drainage hole, mounted on a post or hung from a tree branch. These plans typically call for a single 1×10 cedar board, a few screws, and basic drilling. Beginners love platform feeders because they can be completed in under two hours, making them ideal first woodworking projects.
- Uses scrap cedar, pine, or redwood boards
- Requires only a saw, drill, and sandpaper
- Attracts sparrows, doves, juncos, and cardinals
- Easy to clean and refill daily
Hopper Bird Feeder Plans
A hopper feeder holds seed in a roofed reservoir and dispenses it through a narrow opening onto a landing tray. Hopper woodworking plans introduce basic box-joinery and angled cuts but remain accessible for newcomers. The classic hopper shape also looks stunning in a garden setting, giving your backyard a rustic, handcrafted aesthetic.
- Cut side walls, roof panels, and a seed tray from 3/4-inch cedar
- Assemble the hopper box using butt joints or simple dado joints
- Attach a plexiglass or acrylic window panel for seed visibility
- Add a hanging hook or mount onto a post bracket
Intermediate Bird Feeder Woodworking Plans
Once you have mastered the basics, intermediate plans introduce more complex joinery, weatherproofing techniques, and specialized feeding mechanisms. These projects refine your woodworking skills while producing functional, long-lasting feeders for your backyard.
Tube Feeder Plans
Tube feeders are among the most popular designs for attracting small songbirds like finches and chickadees. Intermediate woodworking plans for a wooden tube feeder involve cutting multiple identical boards to form a cylindrical or hexagonal hopper, drilling precise seed ports, and installing wooden perches. The key challenge is ensuring the seed reservoir is large enough to hold several pounds of sunflower seeds or nyjer thistle while keeping the interior dry.
Many experienced birders recommend using marine-grade plywood or pressure-treated pine for tube feeder bodies because these materials resist moisture far better than standard construction lumber. Adding a sloped roof with a slight overhang further protects the seed from rain and extends the life of your feeder significantly.
Oriole and Hummingbird Feeder Plans
Oriole and hummingbird woodworking plans differ significantly from standard seed feeders because they incorporate sugar-water reservoirs, specialized perches, and orange or red color accents. These designs require careful attention to material safety, since hummingbirds are sensitive to treated wood and certain finishes. Using untreated cedar or bamboo for the structure and food-contact-safe sealants ensures your nectar feeder remains a safe backyard habitat.
Advanced Bird Feeder Woodworking Plans
Advanced woodworkers often pursue multi-level feeders, squirrel-proof mechanisms, and decorative designs that double as yard art. These projects demand precision cutting, complex assembly sequences, and premium finishing techniques.
Multi-Level and Squirrel-Proof Feeder Plans

Building a squirrel-proof bird feeder is one of the most satisfying woodworking challenges available. Advanced plans incorporate weight-activated perches that close access ports when heavier animals land, metal baffles mounted on wooden posts, and reinforced joints that resist chewing. The best woodworking project plans in this category combine functional engineering with beautiful craftsmanship, resulting in a centerpiece birdhouse that doubles as outdoor sculpture.
Multi-level feeders house separate compartments for different seed types, allowing you to attract a wider variety of birds simultaneously. These complex designs often require CNC routing or careful hand-cut joinery but reward the builder with a professional-quality backyard fixture that lasts for years.
Materials and Tools Comparison for Bird Feeder Woodworking
Choosing the right wood species and tools directly impacts the longevity and appearance of your finished bird feeder. The table below compares the most commonly used materials in bird house woodworking plans.
| Material | Durability | Cost | Best For |
| Cedar | Excellent – natural rot resistance | Moderate | All feeder types, especially hoppers and platforms |
| Pine | Good – affordable and easy to cut | Low | Beginner platform feeders and basic hoppers |
| Redwood | Excellent – rich color and weather resistance | High | Premium decorative feeders |
| Marine Plywood | Very good – waterproof bonded layers | Moderate | Tube feeders and all-weather designs |
| Bamboo | Good – sustainable and lightweight | Low | Hummingbird feeders and oriole stations |
For tools, most woodworking plans assume you have access to a circular saw or miter saw, a power drill with various bits, sandpaper in 80- through 220-grit, exterior-grade wood glue, and stainless steel or coated screws to prevent rust corrosion. A pocket-hole jig and a router for decorative edges elevate your projects from basic to professional quality.
Expert Tips for Building Long-Lasting Bird Feeders
Drawing from years of experience in backyard bird watching and woodworking projects, here are actionable tips that separate a mediocre feeder from one that lasts a decade.
- Always pre-drill screw holes to prevent wood splitting, especially near edges and corners where cedar and pine are most vulnerable.
- Use exterior polyurethane or tung oil finishes on the outside surfaces only. Avoid coating interior surfaces where birds perch or eat, as chemical residues can be harmful.
- Include drainage holes in the seed tray and ventilation gaps in the roof to prevent mold growth inside the feeder.
- Angle the roof at least 15 degrees so rainwater sheds off quickly and does not pool on top of the seed reservoir.
- Sand all surfaces to 220 grit before assembly to eliminate splinters that could injure birds or human hands during cleaning.
- Mount feeders at least five feet above the ground and away from dense shrubbery where cats can ambush visiting birds.
Following these woodworking tips consistently ensures your backyard bird feeder remains safe, functional, and attractive through multiple seasons of heavy use.
Comparison of Popular Bird Feeder Woodworking Plan Styles
| Feeder Style | Difficulty Level | Build Time | Target Birds | Material Cost |
| Platform | Beginner | 1-2 hours | Doves, sparrows, cardinals | $10-$15 |
| Hopper | Beginner to Intermediate | 3-4 hours | Cardinals, finches, chickadees | $15-$25 |
| Tube | Intermediate | 4-5 hours | Finches, titmice, nuthatches | $20-$30 |
| Suet | Beginner | 1-2 hours | Woodpeckers, wrens, nuthatches | $8-$12 |
| Multi-Level | Advanced | 6-8 hours | Mixed species | $30-$50 |
| Squirrel-Proof | Advanced | 5-7 hours | Songbirds (selective access) | $25-$40 |
These estimates assume you already own basic power tools and purchase wood from a local lumberyard or home improvement store. Sourcing reclaimed cedar or pallet wood can dramatically reduce material costs while adding unique character to your finished pieces.
Frequently Asked Questions About Bird Feeder Woodworking Plans
What are the best free bird feeder woodworking plans for beginners?
Platform feeders and simple hopper designs dominate the best free bird feeder woodworking plans for beginners because they require only basic cuts, minimal joinery, and inexpensive materials like pine or cedar boards. Websites dedicated to DIY bird watching projects often provide downloadable PDF plans with full cut lists and step-by-step photo instructions that make first-time builds straightforward and enjoyable.
What type of wood is safest for building a bird feeder?
Untreated cedar is widely regarded as the safest and most durable wood for bird feeder construction because it naturally resists moisture, insects, and decay without requiring chemical preservatives. Pine is an affordable alternative for beginners, though it benefits from an exterior waterproof finish. Always avoid pressure-treated lumber for interior surfaces that birds contact, as the chemicals used in treatment can be harmful to wildlife.
How do I waterproof a homemade wooden bird feeder effectively?
The most effective waterproofing method for bird feeder woodworking plans involves applying two to three coats of exterior-grade polyurethane or marine varnish exclusively on outside surfaces. Additionally, designing a sloped roof with a generous overhang, incorporating drainage holes in the seed tray, and using marine-grade plywood for the main body collectively create a weather-resistant structure that protects seed from moisture and extends the feeder’s lifespan significantly.
Can I build a bird feeder from reclaimed or pallet wood?
Yes, reclaimed wood and pallet boards make excellent material for DIY bird feeder plans, provided you verify the wood has not been treated with chemicals or pesticides. Look for heat-treated (HT) stamps on pallets, avoid any marked with MB (methyl bromide), and sand thoroughly before assembly. Reclaimed cedar and oak are particularly prized among woodworking hobbyists for their natural weather resistance and rustic aesthetic appeal.
What tools do I absolutely need to start bird feeder woodworking projects?
The essential tools for beginner bird feeder woodworking plans include a circular saw or miter saw for cutting boards to size, a power drill with screwdriver and drill bits for assembly, a tape measure and combination square for marking cuts, sandpaper in 80 through 220 grit for smoothing edges, and exterior wood glue. A pocket-hole jig is a helpful but optional addition that dramatically speeds up assembly and strengthens joints without requiring advanced joinery skills.
How do I attract specific bird species with my handmade feeder?
Different bird species prefer different feeder styles and food types, so choosing the right woodworking plan is essential. Platform feeders with tray designs attract ground-feeding birds like doves and juncos. Tube feeders with small perches and narrow ports are ideal for finches and chickadees. Suet cages made from wire mesh and wood frames attract woodpeckers, nuthatches, and wrens. Offering the correct seed mix, placing the feeder at appropriate heights, and positioning it near natural shelter all increase your chances of attracting the specific birds you want to observe in your backyard habitat.
Final Thoughts
Bird feeder woodworking plans offer an incredible gateway into the world of woodworking projects, backyard bird watching, and hands-on creativity. Whether you start with a simple platform feeder this weekend or eventually tackle an advanced squirrel-proof multi-level design, each project builds your confidence, sharpens your skills, and transforms raw lumber into a functional piece of backyard art. The satisfaction of watching cardinals, finches, and chickadees land on something you built with your own hands is a reward that no store-bought feeder can replicate. Start with beginner-friendly plans, invest in quality cedar or pine, follow the expert finishing and waterproofing tips outlined above, and watch as your handmade bird feeders become the centerpiece of a thriving backyard ecosystem for years to come.